Hi everyone! Here is the card I have for you today. I made it for one of the Virtual Stamp Night challenges this weekend at Splitcoast Stampers.
Paper: Spice Cake DSP, Soft Suede, Pool Party, Very Vanilla
Ink: Soft Suede
Accessories: Bigz Lattice Die, Pool Party 3/8" Ruffled Ribbon, Snow Burst Embossing Folder, Glue stick, Sponge, Mat Pack and Piercing tool, Soft Suede Marker, Signo White Gel Pen, Cutter Kit
Techniques: Embedded Embossing, Faux Stitching, Distressing, Sponging
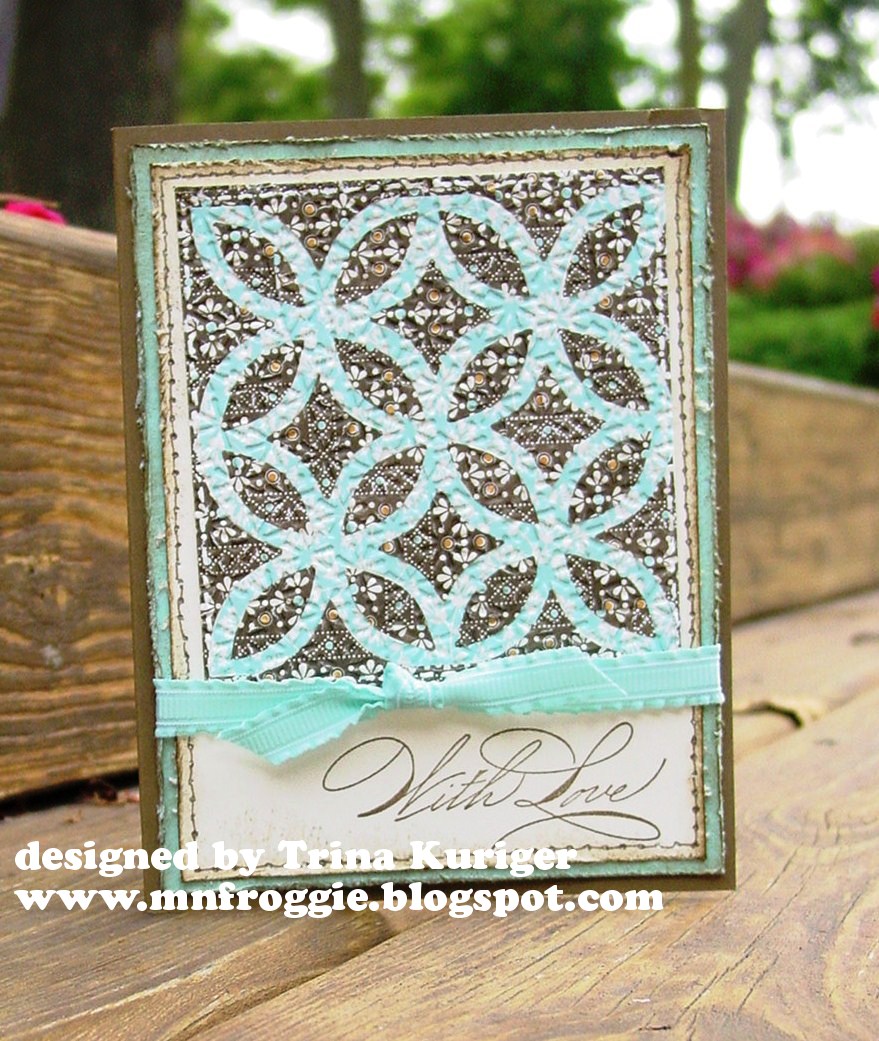
I made this quilt using the new Spice Cake Designer Paper and the Embedded Embossing technique. This paper is in SU!’s new holiday mini, and is available to order starting September 1st, only 6 days away! The card base is Soft Suede, and then there is a 4” x 5¼” mat of Pool Party cardstock and a 3¾” x 5” mat of Very Vanilla cardstock. I distressed the edges of both mats using the Cutter Kit and sponged them both with Soft Suede Classic Ink. On the Very Vanilla base I added an outline of Faux Stitching using the Mat Pack and Paper Piercer Tool and a Soft Suede marker. The sentiment – With Love – is stamped in Soft Suede. It is from the new Hand-Penned Holidays set, which is also in the new Holiday Mini Catalog. The ribbon is Pool Party 3/8” Ruffled Ribbon. Around the quilt I made another row of Faux Stitching using the Signo white gel pen, but it doesn’t really show much.
And here is how I made the embedded embossing quilt.
1. I cut a piece of two different designer papers down to 3 ¾” x 3 ¾”. For this card I used one pattern that was mostly Pool Party and another that was mostly Soft Suede. Then I ran them through the Big Shot using the Lattice Bigz Die.
2. I covered a 3 ¾” x 3 ¾” piece of Vary Vanilla cardstock with glue stick. Then I laid down the Pool Party colored Lattice cut out.
3. I used the Soft Suede piece of designer paper for all the other parts of the cut out (the areas between the lattice and the part surrounding it) and placed them on the same glue stick covered cardstock.
4. Then I put the cardstock with the assembled, glued on pieces in the Snow Burst Embossing Folder and ran it through the Big Shot to give it the textured look. You can do this with any of SU!’s highly detailed embossing folders.
5. Attach the finished product to the card with Sticky Strip or Multipurpose Liquid Glue.
Thanks for reading my blog! I hope you enjoyed today’s post. I love comments, so please leave one!
All items that I used to make this card are available from Stampin’ Up. The Spice Cake Designer Series Paper, Snow Burst Embossing Folder and Hand-Penned Holidays stamp set are all sneak peak items and won’t be available until next week (Sept 1st). If you would like to purchase any of the items shown here, please visit my business website at www.trina_kuriger.stampinup.net
This card is beautiful!
ReplyDelete