Emerging Colors Sunflower – A Tutorial
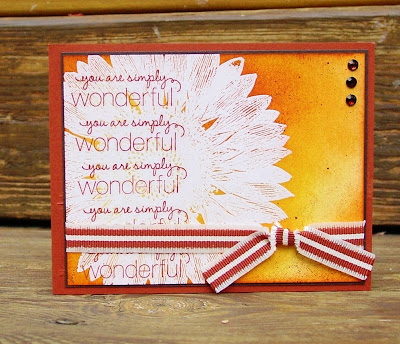
Here is the card I’m showing you all today.
I made this for a recent card swap and I love it! I love the way is looks, plus it has all kinds of fun tips and tricks I am going to share with you.
Stamps: Sunflower, Friendly Phrases
Paper: Whisper White, Early Espresso, Cajun Craze
Ink: Cajun Craze and Versamark; Also So Saffron, Daffodil Delight, Pumpkin Pie and Cajun Craze for sponging
Accessories: Clear Embossing powder, sponges, Cajun Craze marker, 1-1/4" Wide Cajun Craze Grosgrain, Basic Rhinestones, Brown Sharpie
Techniques: Emerging Colors, Emboss Resist, Heat Embossing, Sponging, Fringed Ribbon, Coloring Rhinestones
The technique I used on this card is called Emerging Colors, which is a variation of an Emboss Resist Technique. So first I should define a few techniques here for you. If you use heat embossing on a card and then apply ink over the image, only the areas where there is no embossing will accept the ink. The areas of embossing will “resist” the ink. I will show you an example of that in a moment in my photo tutorial. But first, I want to explain what Emerging Colors is. Emerging Colors is a technique where you stamp on cardstock, then emboss over it with clear embossing powder. Then when you use the emboss resist technique, the image you stamped first will show through the clear embossing powder. Clear as mud? Well, read on, I hope my tutorial will help. Also, if you would like to see some other examples of emboss resist and emerging colors cards, see this previous post.
Emerging Colors Tutorial
1. Stamp your background image on the cardstock in a bold or dark color. This is the image that will “emerge”. For this card I stamped the sentiment from the Friendly Phrases stamp set in Cajun Craze on a 3-7/8” x 5-1/8” card front of Whisper White cardstock.
2. Rub over the cardstock with an Embossing Buddy.
3. Ink your main image with Versamark and stamp it on your cardstock. For this card, I used the Sunflower background stamp.
4. Cover the stamped image with Clear embossing powder, then melt it with your heat gun.
5. Pour and shake off all the excess embossing powder, then melt what remains on the image with your heat gun.
5. Sponge (or brayer) Classic Ink on the cardstock. Notice that the area here that is embossed does not take the ink and so it stays white. Here I used So Saffron ink.
6. I like to use several different colors of ink to give visual texture and depth to the card. If you are going to sponge on several colors, go ahead and do all of them at this point before moving on to the next step. I used Daffodil Delight, Pumpkin Pie and Cajun Craze Classic Inks.
7. (Optional step) On this card, I also applied a spatter of color using the Color Spritzer Tool and a Cajun Craze Stampin Write marker. This isn’t necessary for this technique; I just wanted to explain to you what I did. J
8. There will be a little ink residue on top of the embossing. Wipe this away with a paper towel. Do NOT use a wet towel, it can mess up the ink around your embossed image. But you can huff on the paper towel to moisten it with your breath, this can help to help remove the ink.
9. Embellish and mat as desired. For my card I used a 4” x 5 ¼” Early Espresso mat and a Cajun Craze card base. I also added a ribbon and colored rhinestones. I will post tomorrow to explain how I did both the ribbons and the rhinestones.
Thanks for reading my blog. I love comments, so please leave one if you enjoyed this post!
All products used here are available from Stampin’ Up! I you would like to purchase these, or any other Stampin’ Up! products, please visit my business website at http://www.trina_kuriger.stampinup.net/


Great post! Love this! You used the perfect stamp for this, love how there are little peeks of color in the flower. Fall colors are my very favorite! TFS!
ReplyDelete